1 - Introduction
The objective of this assignment is to extend a character device driver and get familiar with accessing kernel data structures. Specifically, you will:
Extend a character device driver, implemented as a kernel module, to implement a new IOCTL command in the driver. This new IOCTL command can be used to access a
task_struct(task control block) inside the Linux kernel.Extend a user space program to interact with the character device driver to test it.
Remember to comment your code to explain to the CAs exactly what you are doing!
2 - Setup
Boot your Debian virtual machine using a fresh Linux kernel (most likely the one with a name ending with “amd64”). Do NOT boot your own kernel from PA2, it will create problems later.
-
Download the file
template-pa4.zip, move it to your shared folder, and unzip this archive file using the following command:unzip -d "<shared>/<login>-pa4" template-pa4.zipWhere
<shared>is the path to your shared directory, and<login>is your Stevens username (e.g.rtsang1). Read the PA 4 Reading to learn about characters device drivers. You can also read the first three chapters of the “Linux Device Driver 3rd Edition” book, available for free online.
-
In the “scull” character device driver (inside the
driverdirectory) we have prepared several examples of IOCTL commands, which you can find in thescull_ioctlfunction of thescull.cfile. These commands are quickly explained in thescull.hfile: they mostly read / write a single scull_quantum integer which is stored in the kernel memory of the device driver. To test these commands:Install the Linux kernel headers:
sudo apt install linux-headers-$(uname -r)
This is required because you did not compile the “known good” kernel yourself.Modify
MODULE_AUTHORinscull.cto indicate your own student login name.Compile the scull driver code (it is implemented as a kernel module).
Load the scull module into the kernel.
-
Create the special character device file
/dev/scull.See the “Setting up Special Files” section in the “Required Reading” document to learn how to find the major number that the kernel dynamically assigns to the scull module, and how to create the corresponding special character device file; the minor number is always zero (as can be seen in the driver file
scull.c).This device file is going to act as the link between user-mode programs and the kernel module. When a user-mode program opens the
/dev/sculldevice file and does a system call on that file (such as read, write, ioctl, etc.), the kernel will use the major number of that device file to find out which kernel module should be handling that system call. The/dev/sculldevice file is essentially the user-mode symbol representing the scull kernel module (because in Unix, everything is represented as a file). Compile the user-space test program (under
src).Test the various commands of the user-space test program to get a feel of what the commands do (help on currently supported commands can be seen by running:
./scull h). Also check what happens at the same time in the kernel log.Unload the module.
3 - Part 1: Adding a New IOCTL Command
3.1 - Implementation
Extend the “scull” character device driver (inside the driver directory) by adding support for a new SCULL_IOCIQUANTUM IOCTL command. Do NOT delete existing code and do NOT create new files. Only modify existing files to introduce your new functionality.
The new
SCULL_IOCIQUANTUMcommand (ifor “info”) that you must implement should return (copy) atask_infostructure (shown below) to the issuer of the IOCTL in user space. The struct should be populated with the corresponding fields coming from the kernel’stask_struct(and thetask_struct’sthread_info) of the task corresponding to the issuer of the IOCTL, which can be accessed using thecurrentmacro in your IOCTL code in the driver. Note: you must define this structure as shown below.-
The
SCULL_IOCIQUANTUMcommand should be defined with 7 as its number (see thescull.hfile; make sure you read the whole file!) andstruct task_infoas the type of the data being transferred.struct task_info {
unsigned int __state; // Task state (0 means running)
unsigned int cpu; // CPU running this task (from thread_info)
int prio; // Priority
pid_t pid; // PID
pid_t tgid; // TGID
unsigned long nvcsw; // Number of voluntary context switches
unsigned long nivcsw; // Number of involuntary context switches
};
Look at the handling of the SCULL_IOCGQUANTUM command in the scull.h and scull.c files to see an example of copying information from kernel space to user space, except that this example only copies a single integer while your code must copy a complete task_info structure at once.
3.2 - Testing
Extend the user-space test program (inside the src directory) to utilize your new IOCTL by adding the following command, triggered from the command line: ./scull i
The user space program should then print out the information received from the driver, all on one line. For example:
$ ./scull i
Device (/dev/scull) opened
state 0, cpu 3, prio 120, pid 4511, tgid 4511, nv 0, niv 0
Device (/dev/scull) closed
3.3 - Deliverable
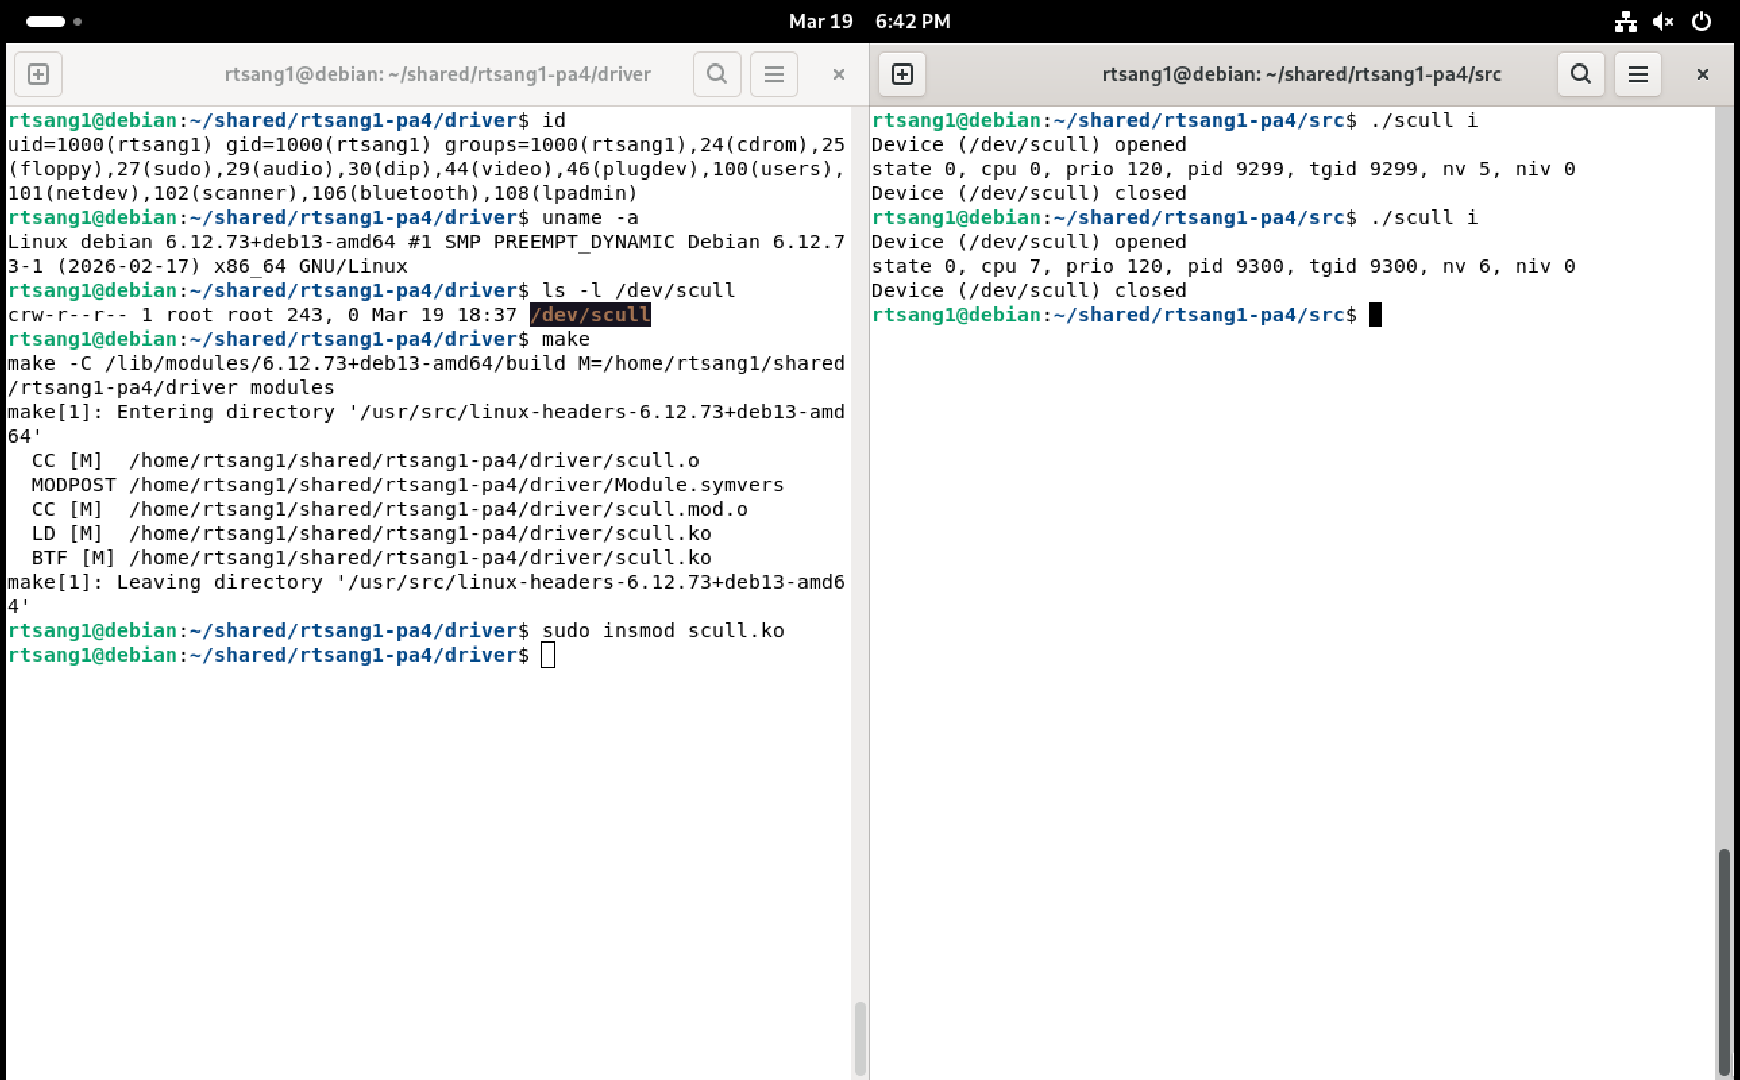
You must provide a single screenshot that shows two Debian terminal windows side by side:
- one showing output of the
id,uname -a, andls -l /dev/scullcommands followed by commands to compile and load your module into the kernel - one showing the result of
tworuns of the./scull iuser-space test command.
Save the screenshot somewhere on your host computer, you will need to submit it later on Canvas (more details about this at the end of this document). For example:
4 - Part 2: Adding Logging
4.1 - Implementation
Extend the code of the scull device driver to log information about every Linux task (process or thread) that uses the new SCULL_IOCIQUANTUM command that you added above.
-
Create a linked list (not an array!) where each node of the linked list records the
pidandtgidof a task that uses your new command:You can design the data structure for list nodes as you wish. The requirement here is that each node in the list should keep at least the above mentioned
pidandtgidinformation.You can create your own functions to operate on the linked list or you can use built-in kernel functions to help you do that, it is up to you (see here for example, and the “Linked Lists” section in Chapter 11 of the “Linux Device Driver 3rd Edition” book reference documentation is available from the kernel.org web site as well as the c-pointers web site).
Make sure your linked list is properly initialized, either when you define the variable for the head of the list or when the device driver itself is initialized at module load time, depending on how you implement the linked list.
Whenever the new
SCULL_IOCIQUANTUMcommand is used by a task and, if the task is not already in the linked list (samepidand sametgid), create a new node recording thepidandtgidof the task and insert that new node at the end of the linked list. If the task is already in the linked list then it is not added again (so no duplicates in the list!)-
When you need to create a new node, use the kernel’s
kmallocfunction to dynamically allocate memory for the new node (see here for example; look in particular at theGFP_KERNELflag).Your code must also properly test the result of
kmallocfor errors, in which case your code must print an error message in the kernel log withKERN_ERRpriority and not modify the linked list. Because multiple user tasks may use the new
SCULL_IOCIQUANTUMcommand concurrently, there may be multiple kernel operations happening on the linked list concurrently. Therefore your kernel code must use a mutex when your code operates on the linked list. To do this, use the Linux kernel version of a mutex, which is similar to the kind of mutex we studied in class (see here for an introduction; also search for the word “lock” on this web page to see examples). Make sure you properly unlock the list in all cases!
-
At the time that the module is unloaded from the kernel, your code must then:
-
Print the information from the linked list to the kernel log (with priority
KERN_INFO), like this:Task 1: PID XYZ, TGID XYZ
Task 2: PID XYZ, TGID XYZ
…Where XYZ is of course replaced with the real numbers from the linked list.
-
Remove each node from the list and deallocate it using
kfree(see here for example).Hint: if you are using the kernel list functions then look at the documentation for the two kernel functions list_for_each_entry_safe and list_del.
-
4.2 - Deliverable
You must provide a single screenshot that shows a Debian terminal window that shows the output of the id command, followed by the module being loaded into the kernel, followed by the scull i user-space test command being run twice in a row, followed by the module being unloaded from the kernel, followed by the output of the sudo dmesg | tail -6 command, showing the last six lines of what your module printed to the kernel log. Check that the PIDs / TGIDs shown in the kernel log when unloading the module match the PIDs / TGIDs printed by the two runs of the user-space scull i test program, and in the correct order, otherwise you will not get points!
For example:
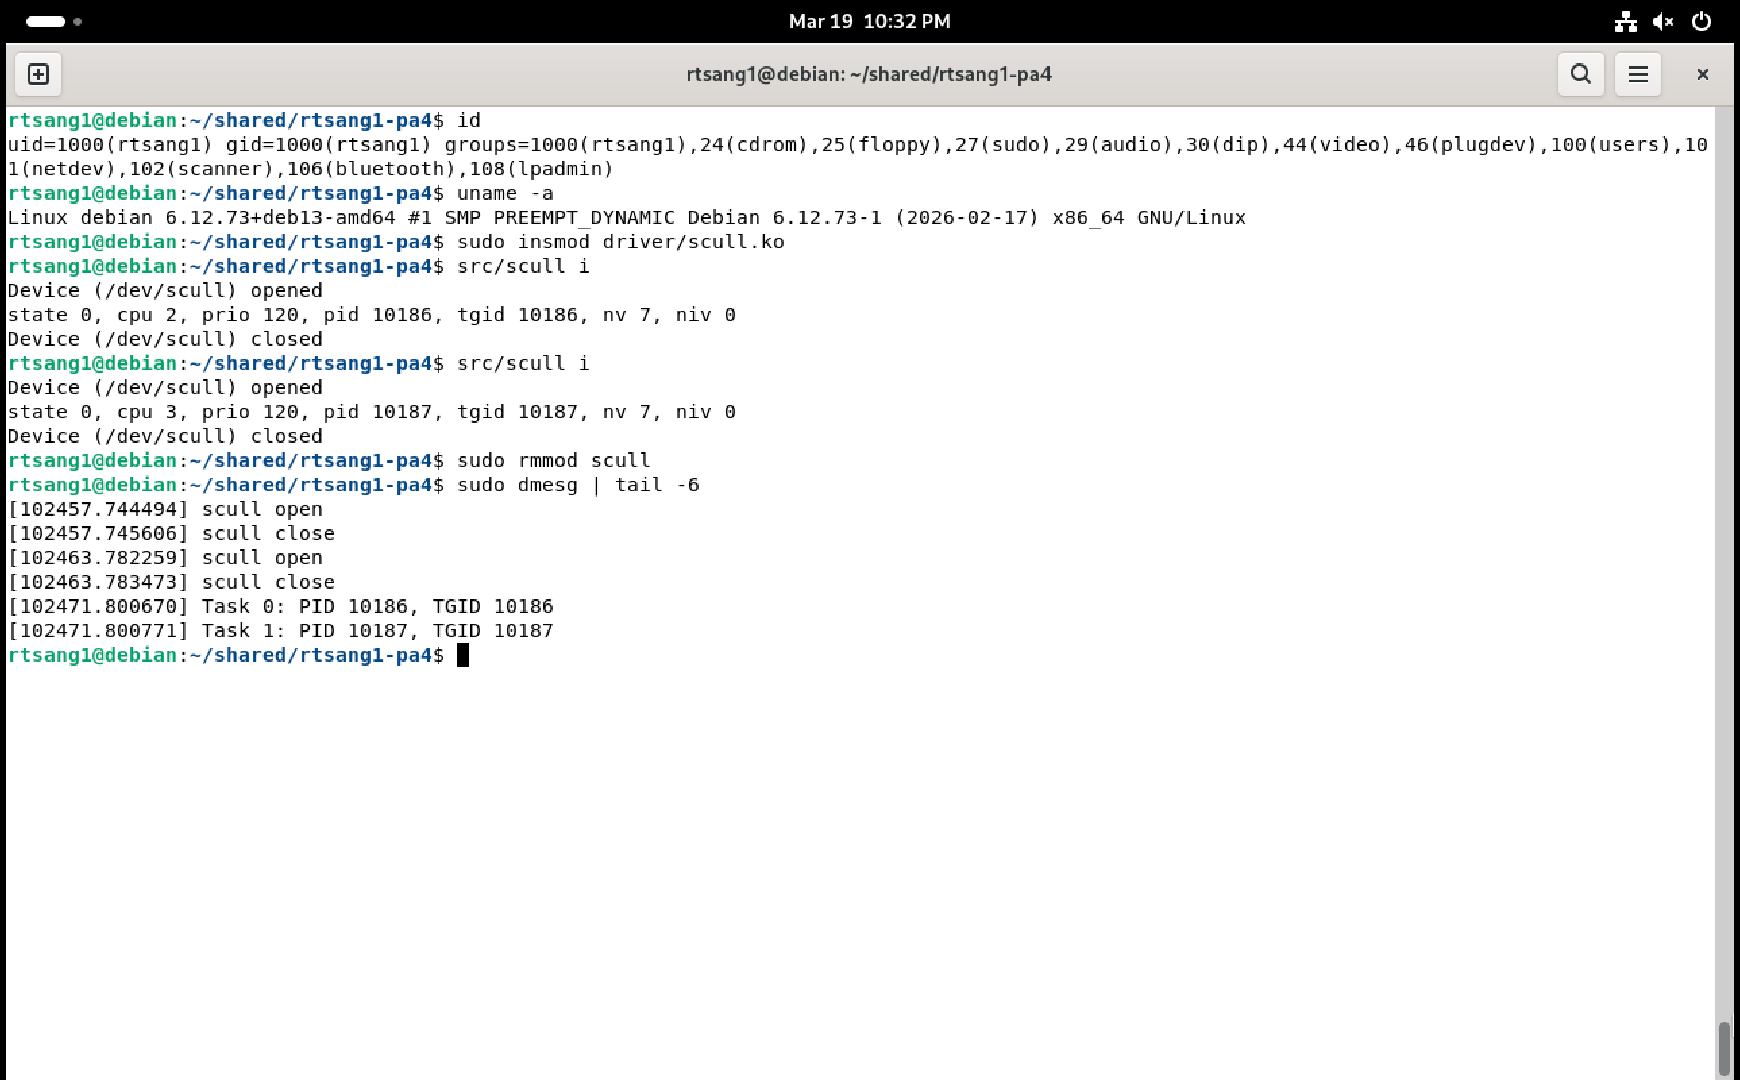
i command5 - Part 3: Testing with Processes
Extend the user-space test program (inside the src directory) to utilize the new IOCTL by adding the following command, triggered from the command line: ./scull p
When given the p command (p for “processes”), the user-space test program should create 4 child processes that each use your SCULL_IOCIQUANTUM IOCTL twice before exiting. Make sure that all 4 processes run concurrently (i.e. the parent process must create all four of them before it starts to wait for each child process to terminate). Also make sure that the /dev/scull device file is opened and closed only once in the parent process, not opened and closed in each child separately. Each process should print out the information received from the driver for each IOCTL done. For example:
$ ./scull p
Device (/dev/scull) opened
state 0, cpu 1, prio 120, pid 3048, tgid 3048, nv 0, niv 0
state 0, cpu 1, prio 120, pid 3048, tgid 3048, nv 0, niv 2
state 0, cpu 2, prio 120, pid 3050, tgid 3050, nv 0, niv 0
state 0, cpu 3, prio 120, pid 3051, tgid 3051, nv 0, niv 0
state 0, cpu 3, prio 120, pid 3051, tgid 3051, nv 0, niv 0
state 0, cpu 0, prio 120, pid 3049, tgid 3049, nv 0, niv 0
state 0, cpu 2, prio 120, pid 3050, tgid 3050, nv 0, niv 2
state 0, cpu 2, prio 120, pid 3049, tgid 3049, nv 1, niv 3
Device (/dev/scull) closed
Note how the printed PIDs are not always in increasing order, which shows that the processes are really running concurrently, not one after the other! Note also how the processes run on different CPUs (and even move between CPUs).
5.1 - Deliverable
You must provide a single screenshot that shows a Debian terminal window that shows the output of the id command, followed by the module being loaded into the kernel, followed by the scull p user-space test command being run once, followed by the module being unloaded from the kernel, followed by the output of the sudo dmesg | tail -6 command, showing the last six lines of what your module printed to the kernel log. Check that the PIDs / TGIDs shown in the kernel log when unloading the module match the PIDs / TGIDs printed by the single run of the user-space “scull p” test program, otherwise you will not get points! Each PID / TGID pair must also only appear once in the kernel log because duplicates are forbidden in the linked list kept by the character device driver’s code. For example:
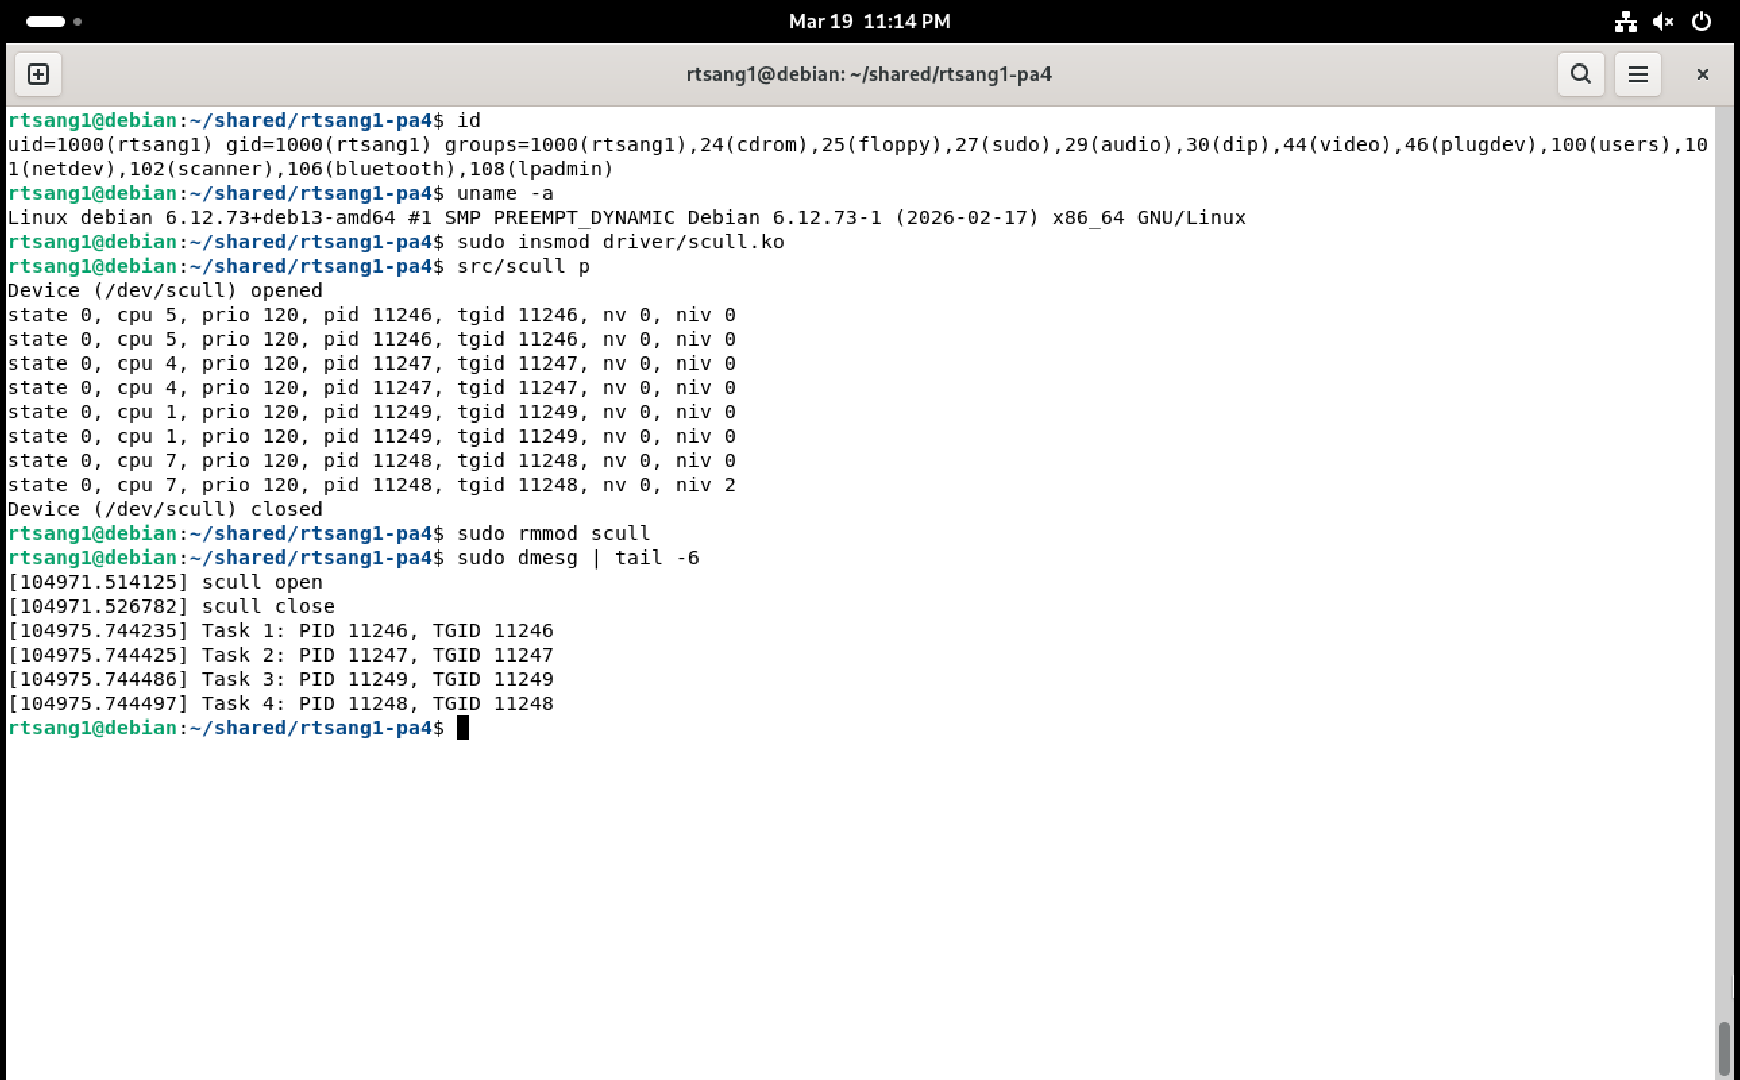
p command6 - Part 4: Testing with Threads
Extend the user-space test program (inside the src directory) to utilize the new IOCTL by adding the following command, triggered from the command line: ./scull t
When given the t command (t for “threads”), the user-space test program should create 4 threads that each use your SCULL_IOCIQUANTUM IOCTL twice before exiting. Make sure that all 4 threads run concurrently (i.e. the main thread must create all four of them before it starts to wait for each thread to terminate). Also make sure that the /dev/scull device file is opened and closed only once in the main thread, not opened and closed in each new thread separately.
Hint: give the address of the variablefdas the fourth argument ofpthread_create; the thread function will then receive this address as its pointer argument.
Each thread should print out the information received from the driver for each IOCTL done. For example:
$ ./scull t
Device (/dev/scull) opened
state 0, cpu 0, prio 120, pid 3620, tgid 3618, nv 0, niv 0
state 0, cpu 0, prio 120, pid 3620, tgid 3618, nv 0, niv 2
state 0, cpu 1, prio 120, pid 3621, tgid 3618, nv 0, niv 0
state 0, cpu 2, prio 120, pid 3622, tgid 3618, nv 0, niv 0
state 0, cpu 1, prio 120, pid 3622, tgid 3618, nv 1, niv 0
state 0, cpu 2, prio 120, pid 3619, tgid 3618, nv 0, niv 0
state 0, cpu 3, prio 120, pid 3619, tgid 3618, nv 1, niv 3
state 0, cpu 1, prio 120, pid 3621, tgid 3618, nv 0, niv 3
Device (/dev/scull) closed
Note how the printed PIDs are not in increasing order, which shows that the threads are really running concurrently, not one after the other! Note also how all the threads have the same TGID but different PIDs. Finally, note how the threads run on different CPUs (and even move between CPUs).
6.1 - Deliverable
You must provide a single screenshot that shows a Debian terminal window that shows the output of the id command, followed by the module being loaded into the kernel, followed by the scull t user-space test command being run once, followed by the module being unloaded from the kernel, followed by the output of the sudo dmesg | tail -6 command, showing the last six lines of what your module printed to the kernel log. Check that the PIDs / TGIDs shown in the kernel log when unloading the module match the PIDs / TGIDs printed by the single run of the user-space scull t test program, otherwise you will not get points! Each PID / TGID pair must also only appear once in the kernel log because duplicates are forbidden in the linked list kept by the character device driver’s code. For example:
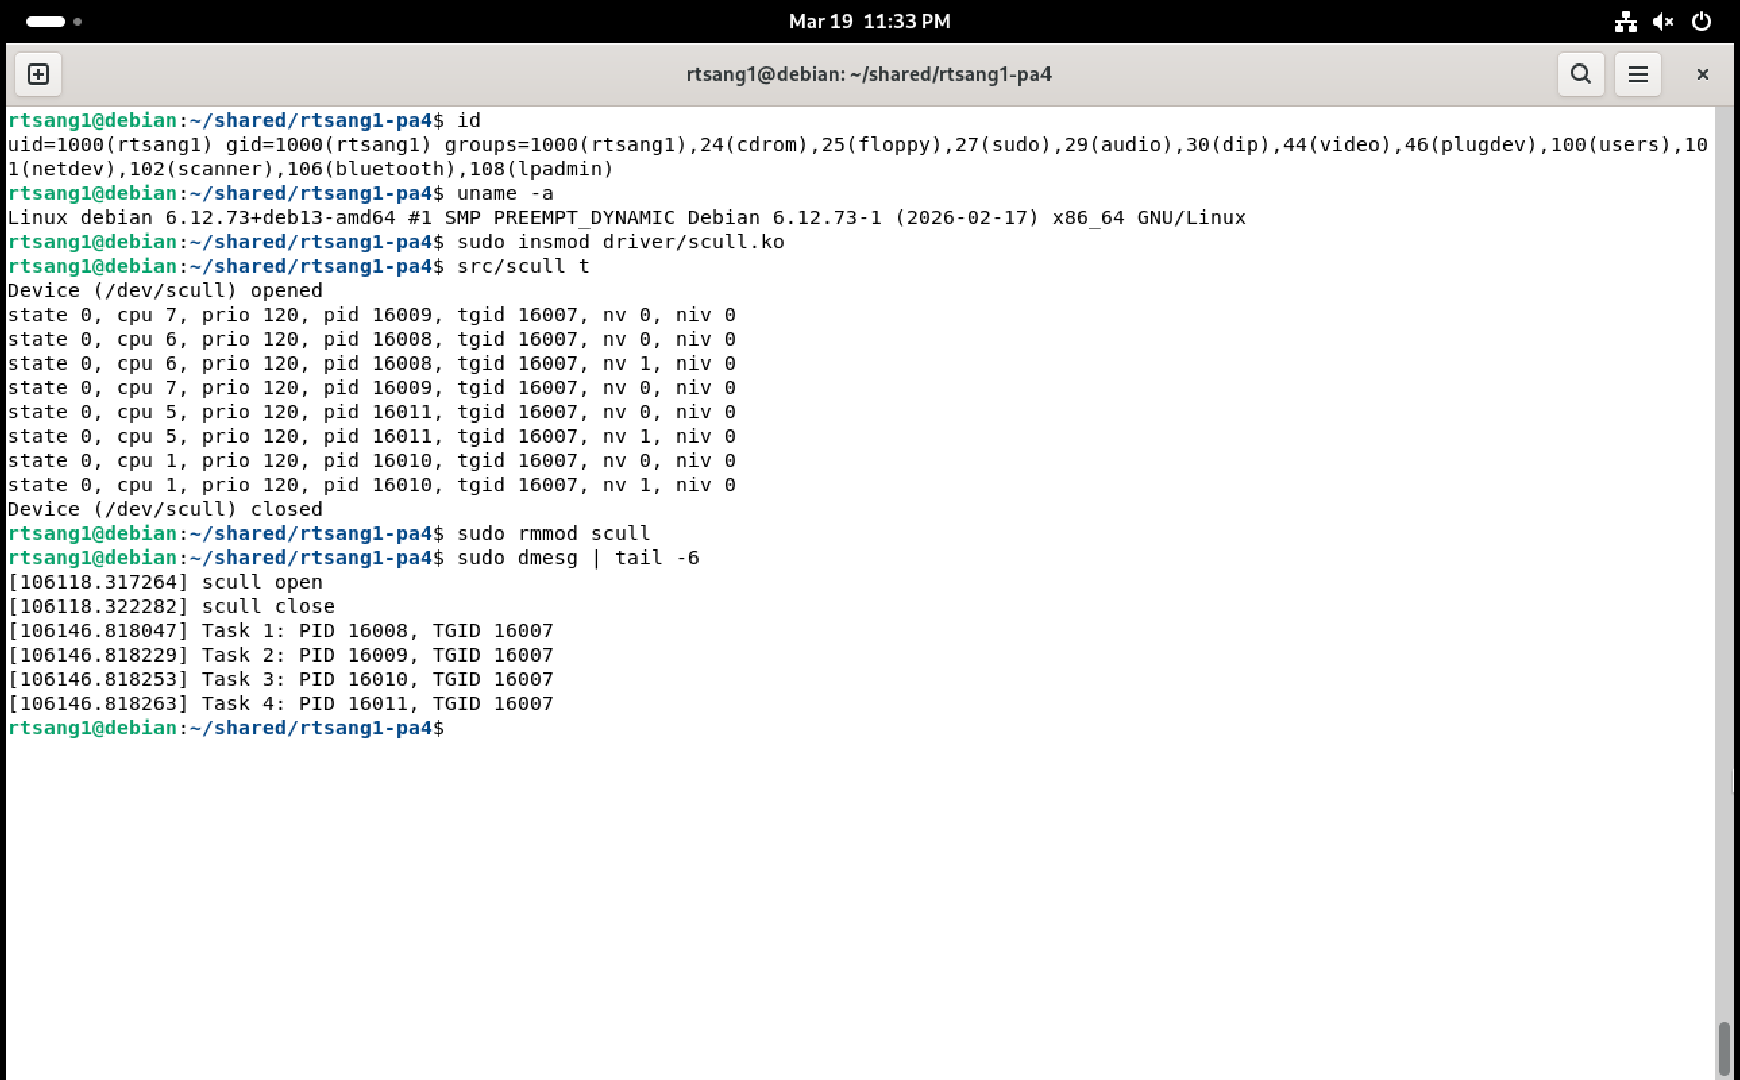
t command7 - Deliverables
Remember to put comments everywhere in your code to explain to the CAs what your code is doing! Check that your code still works after adding the comments!
Once both your kernel module and your user-space test program work, execute make clean in both the ~/<login>-pa4/driver/ and ~/<login>-pa4/src/ directories to delete any extraneous files there (replace <login> with your student login name, of course).
In the top level of the same ~/<login>-pa4 submission directory, create a PDF file named screenshots.pdf that contains:
Your full name.
The Stevens Honor pledge.
The four screenshots you created above: one for each of Section 3.3, Section 4.2, Section 5.1, and Section 6.1. Make sure the screenshots are clearly readable.
Also add a short explanation before each screenshot so the Course Assistants know what you are trying to show in those screenshots.
At this point the ~/<login>-pa4 directory must contain all the files you were given in the original zip file (with some of them modified by you, of course), plus your PDF file containing the screenshots, nothing more, nothing less.
For example:
rtsang1-pa4
├── Makefile
├── screenshots.pdf
├── driver
│   ├── Makefile
│   ├── scull.c
│   └── scull.h
└── src
    ├── Makefile
    └── scull.c
Create your submission zip file by running make zip at the top level of the directory.
Once you have correctly created the file <login>-pa4.zip, copy it to the host OS using your shared folder, double-check its content to make sure it contains everything, then submit it on Gradescope.
8 - Rubric
| 20% | Code for Section 3.1 |
| 5% | Code for Section 3.2 |
| 5% | Screenshot for Section 3.3 |
| 20% | Code for Section 4.1 |
| 10% | Screenshot for Section 4.2 |
| 10% | Code for Section 5 |
| 10% | Screenshot for Section 5.1 |
| 10% | Code for Section 6 |
| 10% | Screenshot for Section 6.1 |
You do not get points for screenshots unless the corresponding code is submitted too. So for example you will not get points for the first screenshot listed above if you do not also provide the corresponding code implementing the requirements of Section 3.2. Screenshots alone will not get you any points at all. So make sure you double check everything before you submit on Gradescope.