1 - Description
Warning: you must read everything carefully and be sure to complete all steps for your machine. Skipping steps can lead to unrecoverable states and you may be forced to fully restart the assignment. Fully read the instructions for each step before doing that step.
The goal of this assignment is for you to learn how to install different Unix-based operating systems:
- OpenBSD
- Arch Linux
- Debian (which we will use for subsequent assignments)
In CS 382 and CS 385, you may have learned how to install Ubuntu, but were likely relying on the installation software. In this assignment, you will be doing the installations manually to get a better understanding of the steps required to install a new operating system.
Terms:
- “host”: your own physical computer running either Windows or macOS.
- “guest”: a virtual machine (VM) running a Unix-based operating system.
2 - Preliminary Steps
-
Make sure your host computer has enough disk space available. You will need about 60 GB of free disk space for installing Debian and completing future programming assignments. If you do not have enough disk space, you can delete some of your data, move it to a cloud, or consider purchasing an external drive to store your data.
- Note: it is recommended that you not attempt to do coursework in an external drive, as the access times can hurt performance.
Make sure your host computer has a reliable internet connection before you begin, as you will be downloading quite a bit of data in this assignment.
You may need to reboot your host machine. Be prepared for this.
3 - OS-Specific Steps
3.1 - Windows
VirtualBox is virtualization software (a type-2 hypervisor) you can install on your host machine to create and manage guest virtual machines running on top of your host OS.
Before you install and use VirtualBox, first you need to make sure that Windows’ own Hyper-V VM software is disabled, otherwise it will conflict with VirtualBox, causing VirtualBox to fail or run in an extremely slow emulation mode.
Open
Control Panel.Select “Programs and Features”.
Select “Turn Windows features on or off”.
-
Ensure the following features are unchecked if present in the list:
- “Hyper-V”
- “Windows Hypervisor Platform”
- “Virtual Machine Platform”
Select “OK” and reboot your computer if prompted.
Open
Windows Security.Select “Device security” in the left column.
Select “Core isolation details” link.
-
Ensure “Memory Integrity” is turned off.
- Leaving this on will force VirtualBox to run in emulation mode rather than the faster virtualization mode.
Reboot your computer if prompted.
3.2 - Macos
VirtualBox should work without issue on Intel-based Apple computers. If you have an Intel-based computer, skip this section.
Since VirtualBox does not support x86 emulation on Apple Silicon, we will need to use UTM.
Notes:
- VMWare Fusion Pro for Mac will work for subsequent programming assignments, but Parallels will not.
- The virtualization software you use must allow you to select the kernel to boot at VM startup. (Multipass will not work)
3.2.1 - UTM
You can install UTM from the website or using homebrew:
brew install --cask utmWhen using UTM, every time you create a new VM, you must do all of the following:
-
Create the VM:
- Select an emulation VM, not a virtualization V, because you are going to install operating systems for amd64, not your native arm64 architecture.
- Select “Other” when installing OpenBSD, or “Linux” when installing Arch or Debian.
- Select the correct ISO file for the desired OS.
-
For “Disk Size”:
- OpenBSD: 6 GB
- Arch: 6 GB
- Debian: 60 GB
- Continue VM creation using default values and select “Save”. Do NOT start the new VM yet.
-
Configure VM Settings before installing an OS:
- Select the Settings icon in the upper right corner of the UTM window.
-
Under “System”:
-
Under “QEMU”:
-
Under “Input”:
- Disable all USB options. (prevent conflict between PS/2 and USB virtual keyboards)
-
Under “Display”:
- Set “Emulated Display Card” to “VGA” (Linux distros will have blank screen otherwise)
Save settings and start the VM.
This process is not regularly tested, so please contact the instructor if you run into issues.
4 - Installing Virtualbox
This need only be done once. Skip this section if you are on Mac and have installed UTM.
4.1 - Virtualbox Application
If you already have VirtualBox v7.x installed, you may skip this section.
You can use a package manager to install VirtualBox, or install it manually:
- Go to the VirtualBox download page.
- Under “VirtualBox Platform Packages”, download the correct version for your host platform and launch it.
- Use all default options during install.
- Ignore “Missing Dependencies Python Core” warnings.
Chocolatey is a Windows package manager.
Once installed, you can install VirtualBox using:
choco install virtualbox4.2 - Virtualbox Guest Additions
You will need to install guest additions on Debian later in this assignment.
Download the VboxGuestAdditions_X.Y.Z.iso from the X.Y.Z/ folder at download.virtualbox.org.
5 - Installing Openbsd
OpenBSD is one of the members of the BSD family of Unix operating systems. It is interesting for you to install and use because:
- It has a text-based installation procedure that clearly shows all required steps without being too difficult to use.
- OpenBSD is designed to be self-contained and work well “out of the box” with little extra software or configuration required.
-
It makes it easy to see the difference between
- the bootloader (the early time software that allows you to select which kernel to boot)
- the kernel proper
- the operating system services
- the text-based console with a shell command line interpreter
- the X Window graphical user interface
- As a CS or CSE student, you should use a BSD system at least once in your life. Unix is more than just Linux!
5.1 - Creating the OpenBSD VM
-
Download the ISO
- Visit the OpenBSD website.
- Click the “Download” link in the left column of the web page.
- Download the ISO
installXY.isofile (note the extension) for the “amd64” architecture. (this includes students on Apple Silicon)
-
Start VirtualBox and click the blue “New” button to create a new VM.
- Give the name “cs492-openbsd” to your new VM.
- For the “ISO image”, select the
installXY.isofile you just downloaded. -
Under “Hardware”:
- Memory size: 4096 MB
- Processors: max physical cores (green zone) (red zone indicates logical cores, which is irrelevant because OpenBSD disables hardware multithreading for security reasons.)
-
Under “Hard Disk”:
- Virtual hard disk size: 6 GB
- Hit “Finish”.
At this point, you should have a VM with an empty 6GB virtual disk and a virtual CD containing the OpenBSD installation software.
-
Configure VM display:
- Select the orange “Settings” button in VirtualBox on the VM
-
Under “Display”:
- Change “Graphics Controller” to “VBoxSVGA”. (seems to work better with OpenBSD. ignore any warnings)
-
Under “Storage”:
- Select “Controller” (with hard disk and CD as children):
- Change “Type” to “AHCI”
- Hit “OK”
5.2 - Installing OpenBSD on the VM
Remember to read each step before doing it!
5.2.1 - Booting the VM
-
Click the green “Start” arrow to start your virtual machine.
- The virtual machine will automatically boot from its virtual CD and start the installation software, which is a special copy of OpenBSD.
-
You should see a
boot>prompt. This is the OpenBSD bootloader, which allows you to select the kernel you want to use. In this case, you can wait 5 seconds or hitEnterto allow the bootloader to automatically select a kernel.After the kernel is selected, for a brief time, you should see text with numbers. This is the bootloader copying the selected kernel from the virtual CD into VM memory.
When the background turns blue it means the kernel itself is running. The kernel will print a bunch of info to the screen describing the hardware it detects.
-
(VirtualBox-only) Enlarging the screen if needed:
- Click “View” in the window’s upper left corner
- Click “Virtual Screen 1”
- Select a scaling percentage (can be changed again later)
5.2.2 - Network and User Configuration
After the kernel has finished booting, the OpenBSD install script will begin automatically and you will be presented with the “Install, Upgrade, Autoinstall, Shell” prompt.
This installation script has many steps. Most are trivial, though a few are complex. Most will also have a default option between square brackets ([]), which is usually (but not always) correct.
If you make a mistake during the installation procedure, you can press Ctrl-C to abort the script and restart from the beginning by typing install at the # prompt.
-
Type
Iand hitEnterto begin the install script.For the first portion of the script, configure OpenBSD according to the table below.
Setting Value Comment Keyboard Layout Default ( US/English)System Hostname obsdNetwork Interface to Configure Default ( em0)OpenBSD’s name for the (virtual) hardware Ethernet network controller IPv4 Address Default ( autoconf)OpenBSD will use the DHCP network protocol to automatically configure an IP address for the Ethernet network interface of the VM.
The installation script will also configure the system to automatically use DHCP to get an IP address every time you reboot the VM.
IPv6 Address Default ( none)Network Interface Default ( done)rootPasswordobsdNote: on many Unix systems, passwords will not appear on-screen when typed in a shell. Start sshdnoNote: we do not want anyone using ssh to login to the VM. Run X Window Default ( yes)Use xenodmDefault ( no)Note: you will learn how to start the X Window GUI manually later. Setup User Stevens login name e.g. rtsang1fromrtsang1@stevens.edu.Full Name Your full name Password obsdYour user account password. Time Zone Default ( EST)Note: you can input ?for a list of available time zones.
5.2.3 - Hard Disk Configuration
At this point, you should be at hard disk configuration.
A single hard disk can be divided into multiple “primary partitions”, with each partition storing a different operating system (sort of). For example, one primary partition could store Windows while another stores OpenBSD, and the OS to run could be chosen at boot-time using the bootloader. This is called multi-booting.
In this stage we will first configure the Master Boot Record (MBR), which stores the number of primary partitions, their type, and their size, in the first sector (data block) of the hard disk.
Then we will configure at least one file system. For simplicity, we will use a single primary partition occupying the entire virtual hard disk that has a single FFS file system for the root directory.
Inside each primary partition, multiple file systems can be created for the same OS (if the OS supports it). For example, one OpenBSD FFS file system for the
/root directory, and another FFS for the/homeuser home directories can be created in the same primary partition.Linux also supports multiple file systems in a partition, but uses ext4, but also supports ext2 and btrfs among others.
By contrast, Windows only has one NTFS file system per primary partition (e.g.
C:andD:drives).
5.2.3.1 - Root Disk and MBR Configuration
-
Configure the root disk and MBR as follows:
Setting Value Comment rootDisksd0To see a full list of available hard disks in the VM, type
?and hitEnter.sd0should be the only option, with the name “VBOX HARDISK” (or “QEMU HARDISK” for Apple users on UTM), and a size of 6 GB.This is the hard disk where the OpenBSD primary partition and root filesystem will be created.
rootDisk EncryptionDefault ( no)This option encrypts the entire hard disk, which would affect performance if selected. Whole disk MBR/GPT Default ( whole)Since the disk is still empty, it does not yet have a Master Boot Record. When you select
whole, the installation script will create a single primary partition usingfdiskthat will occupy the entirety of the virtual hard disk. Then it will create a new MBR for the partition.Note that the primary partition does not start in disk sector 2 (which immediately follows the MBR). Some empty disk space must be left between the MBR and the start of the partition to store the OpenBSD bootloader.
fdiskautomatically accounts for this.GPT is a more recent and more advanced version of the same kind of partition table that allows you to create more than 4 primary partitions. MBR with up to 4 partitions is plenty for us.
5.2.3.2 - File System Configuration
Now we need to create a single / root file system (rfs) in our primary partition.
The install script automatically offers a default configuration of file systems, with a root file system in addition to /usr, /home, and “swap” file systems. (swap is used for memory management and will be revisited later in the course)
Since this is not what we want, we will configure our file system manually.
-
Start the custom file system configuration by entering
cinto the prompt.This will start OpenBSD’s disklabel interactive editor, and a new prompt (
sd0>) will appear.In this mode you will be able to specify the number of file systems to create, along with their location, size, type, and directory path (e.g.
/,/usr,/home).You can enter
?into the prompt to get a list of available commands. -
Enter
ato add a new file system with the following configurations:Setting Value Comment Partition Default ( a)File system “a” on disk “sd0” will have a full name “sd0a”.
Note that OpenBSD uses the word “partition” in place of “file system” for historical reasons.
Offset Default The offset indicates the hard disk sector number where the start of the file system will be placed in the primary partition.
Do not try to change this unless you know how the file system is organized in the primary partition.
Size Default Size of the file system in number of disk sectors.
The default value corresponds to the size of the entire primary partition. A different size (e.g. “3G”) could be specified to leave room for another file system.
FS Type Default ( 4.2BSD)Standard file system type for BSD systems (also called “FFS” or “UFS”). Mount point /Mount the file system at the root directory. -
When the prompt returns (
sd0*>), you can enterpto show the current state.You should see the
afile system, and the unusedcfile system, which represents the whole primary partition.The
*in the prompt indicates that the changes are pending;disklabelhas not yet changed anything on the hard disk (much like git staging before commits). -
When you are ready to commit changes to the disk, enter
w, thenqto quitdisklabel.After quitting, the root file system should be initialized automatically, and you will see logs about
/dev/sd0a.Note that this new file system is mounted at
/mnt, not/. This is because the virtual CD was mounted at/on boot, and the installer program is currently using it./mntis a temporary mount point and the newly configured file system will be mounted at/the next time the VM boots from the virtual hard disk.
5.2.4 - Set Installation
“Installing the sets” refers to copying the OpenBSD operating system files (kernel, system utilities, man pages, GUI, etc.) to the root file system.
-
Install the sets according to the table below:
Setting Value Comment Location of sets cd0The virtual CD (located at cd0) includes all the required file sets (file packages).Pathname to sets Default ( X.Y/amd64)This is the path on the CD to the location of the file sets. Set names Default ( all,done)-
bsd: kernel for mono-processor machines -
bsd.mp: kernel for multiprocessor machines (installer will select right kernel automatically based on detected number of cores) -
bsd.rd: special kernel for installation (currently in use) -
baseXY.tgz: basic utilities (ls, etc.) -
compXY.tgz: C compiler and C headers -
manXY.tgz: manual pages -
x*.tgz: X Window GUI files
Continue without verification yesThe warning about missing SHA256.sigis normal for CD-based installation files, since adding a cryptographic signature file to the ISO file would alter the resulting file’s signature.(Maybe) Location of sets Default ( done)After the file sets are copied you may be prompted to install more software. We do not need to. -
If you get a warning that says “Time appears wrong”, hit
Enterand continue.-
At this point, the installation script will automatially create special files in the
/devdirectory of your new system to access the (virtual) hardware (“making all device nodes…”).It will select the correct kernel (“using bsd.mp instead of bsd”).
It may apply a firmware update if needed (
fw_update). Firmware is a separate bit of software that runs directly on a hardware device components, like the disk controller or network controller. Firmware is not part of OpenBSD and is usually hardware-specific.OpenBSD will “re-link” (randomize) kernel code locations for security reasons (think ASLR).
Finally, the script will silently install the OpenBSD bootloader on the hard disk between the MBR and the start of the primary partition.
The bootloader is necessary so that the VM can locate and load the OpenBSD kernel.
-
Enter
hto halt. Wait until you see “Please press any key to reboot”, then close the window. Do not use the default (reboot) option!VirtualBox: Select “Power off the machine” in the prompt.
The virtual installation CD needs to be ejected before we reboot the VM.
-
Eject the installation CD.
In VirtualBox:
- Open the VM’s settings.
-
Under “Storage”:
- Select the
installXY.isoCD file. - Select the blue CD icon to the right of the “Optical Drive” menu.
- Select “Remove Disk from Virtual Drive” to simulate ejecting the installation CD.
- Click “OK”.
- Select the
In UTM:
- Stop the VM if it’s status is “Suspended” (“Stop” button in upper right corner).
- Open the VM’s settings by right-clicking on the VM and selecting “Edit”.
- Select the “IDE Drive” that corresponds to the
installXY.isofile. - Select “Clear” next to the “Path” entry to remove the file from the virtual CD drive.
5.3 - Using OpenBSD
After starting the VM, you should see a similar sequence of steps. The boot> prompt will appear for 5 seconds before copying the kernel into main memory. The text background will turn blue while the kernel is running. The difference this time is that the VM is booting from its own disk rather than the installation CD.
After the kernel finishes booting, the system services will start, showing messages with a black background again.
Some things you might see:
-
syslogd: the OS message loggin service -
ntpd: the system time service -
smtpd: the system’s local email service -
sndiod: system sound service
All these services are part of the OpenBSD operating system, but they run as separate user-mode processes outside the kernel.
5.3.1 - Setting User Admin Privileges
Login as
root, useobsdpassword. This will get you akshshell by default with a promptobsd#(the system name followed by#to indicate admin user instead of the normal$).-
Give your user account (your Stevens login name) admin privileges:
cd /etc ; ls. Most OpenBSD system config files live here.-
cp examples/doas.conf .. Create adoas.confconfig file for thedoascommand (likesudoin Linux). The example config will automatically allow any user in thewheeluser group to run commands as administrator.You can view the contents of the file with
cat doas.conf. -
Add your user account to the
wheelgroup.Luckily, users created during the installation process are automatically added to the
wheelgroup.You can check who is in the
wheelgroup withgrepusing the commandgrep wheel /etc/group. exitto exit the shell and return to the login prompt.
5.3.2 - Starting the X Window GUI
The text-based screen, or text user interface (TUI), where your shell runs is called the virtual console. OpenBSD (and Linux) have multiple virtual consoles available, but these are not always the most convenient.
Instead, we will manually start the X Window GUI.
-
Login with your Stevens username (e.g.
rtsang1) andobsdas your password. You will be logged in to your user home directory.Use
pwdto see the current directory path, andls -lato see a detailed list of files in the current directory. -
Run
doas xenodmto manually start the X Window GUI. Enter your the root password (obsd) and you should see the GUI.OpenBSD users do not usually need to use admin privileges with
doasto start the X Window Gui, but it is required here because the VM has a very basic virtual graphics card.The default OpenBSD GUI is quite ugly. The bare X Window system minimally handles:
- the mouse
- the keyboard
- the computer screen
- the FVWM window manager (allows you to have menus; create, move, and resize windows; etc.)
OpenBSD has better GUIs available (e.g. KDE) but the bare GUI is enough for this assignment.
5.4 - Deliverables
To prove you have installed and used OpenBSD successfully, you will submit a screenshot showing the OpenBSD kernel version and the output of the id command.
-
Enlarge the text in the
xtermterminal window.- Hold
Ctrl+Right-Clickin the center of thextermwindow to see text size options and select “Huge”.
- Hold
-
Run the following commands:
-
uname -ato show OpenBSD kernel version. -
idto show username and user groups.
-
-
Take a screenshot of the OpenBSD screen. You can use VirtualBox’s built-in option
View -> Take Screenshot, or your host OS screenshot tools.An example can be seen in Figure Figure 1.
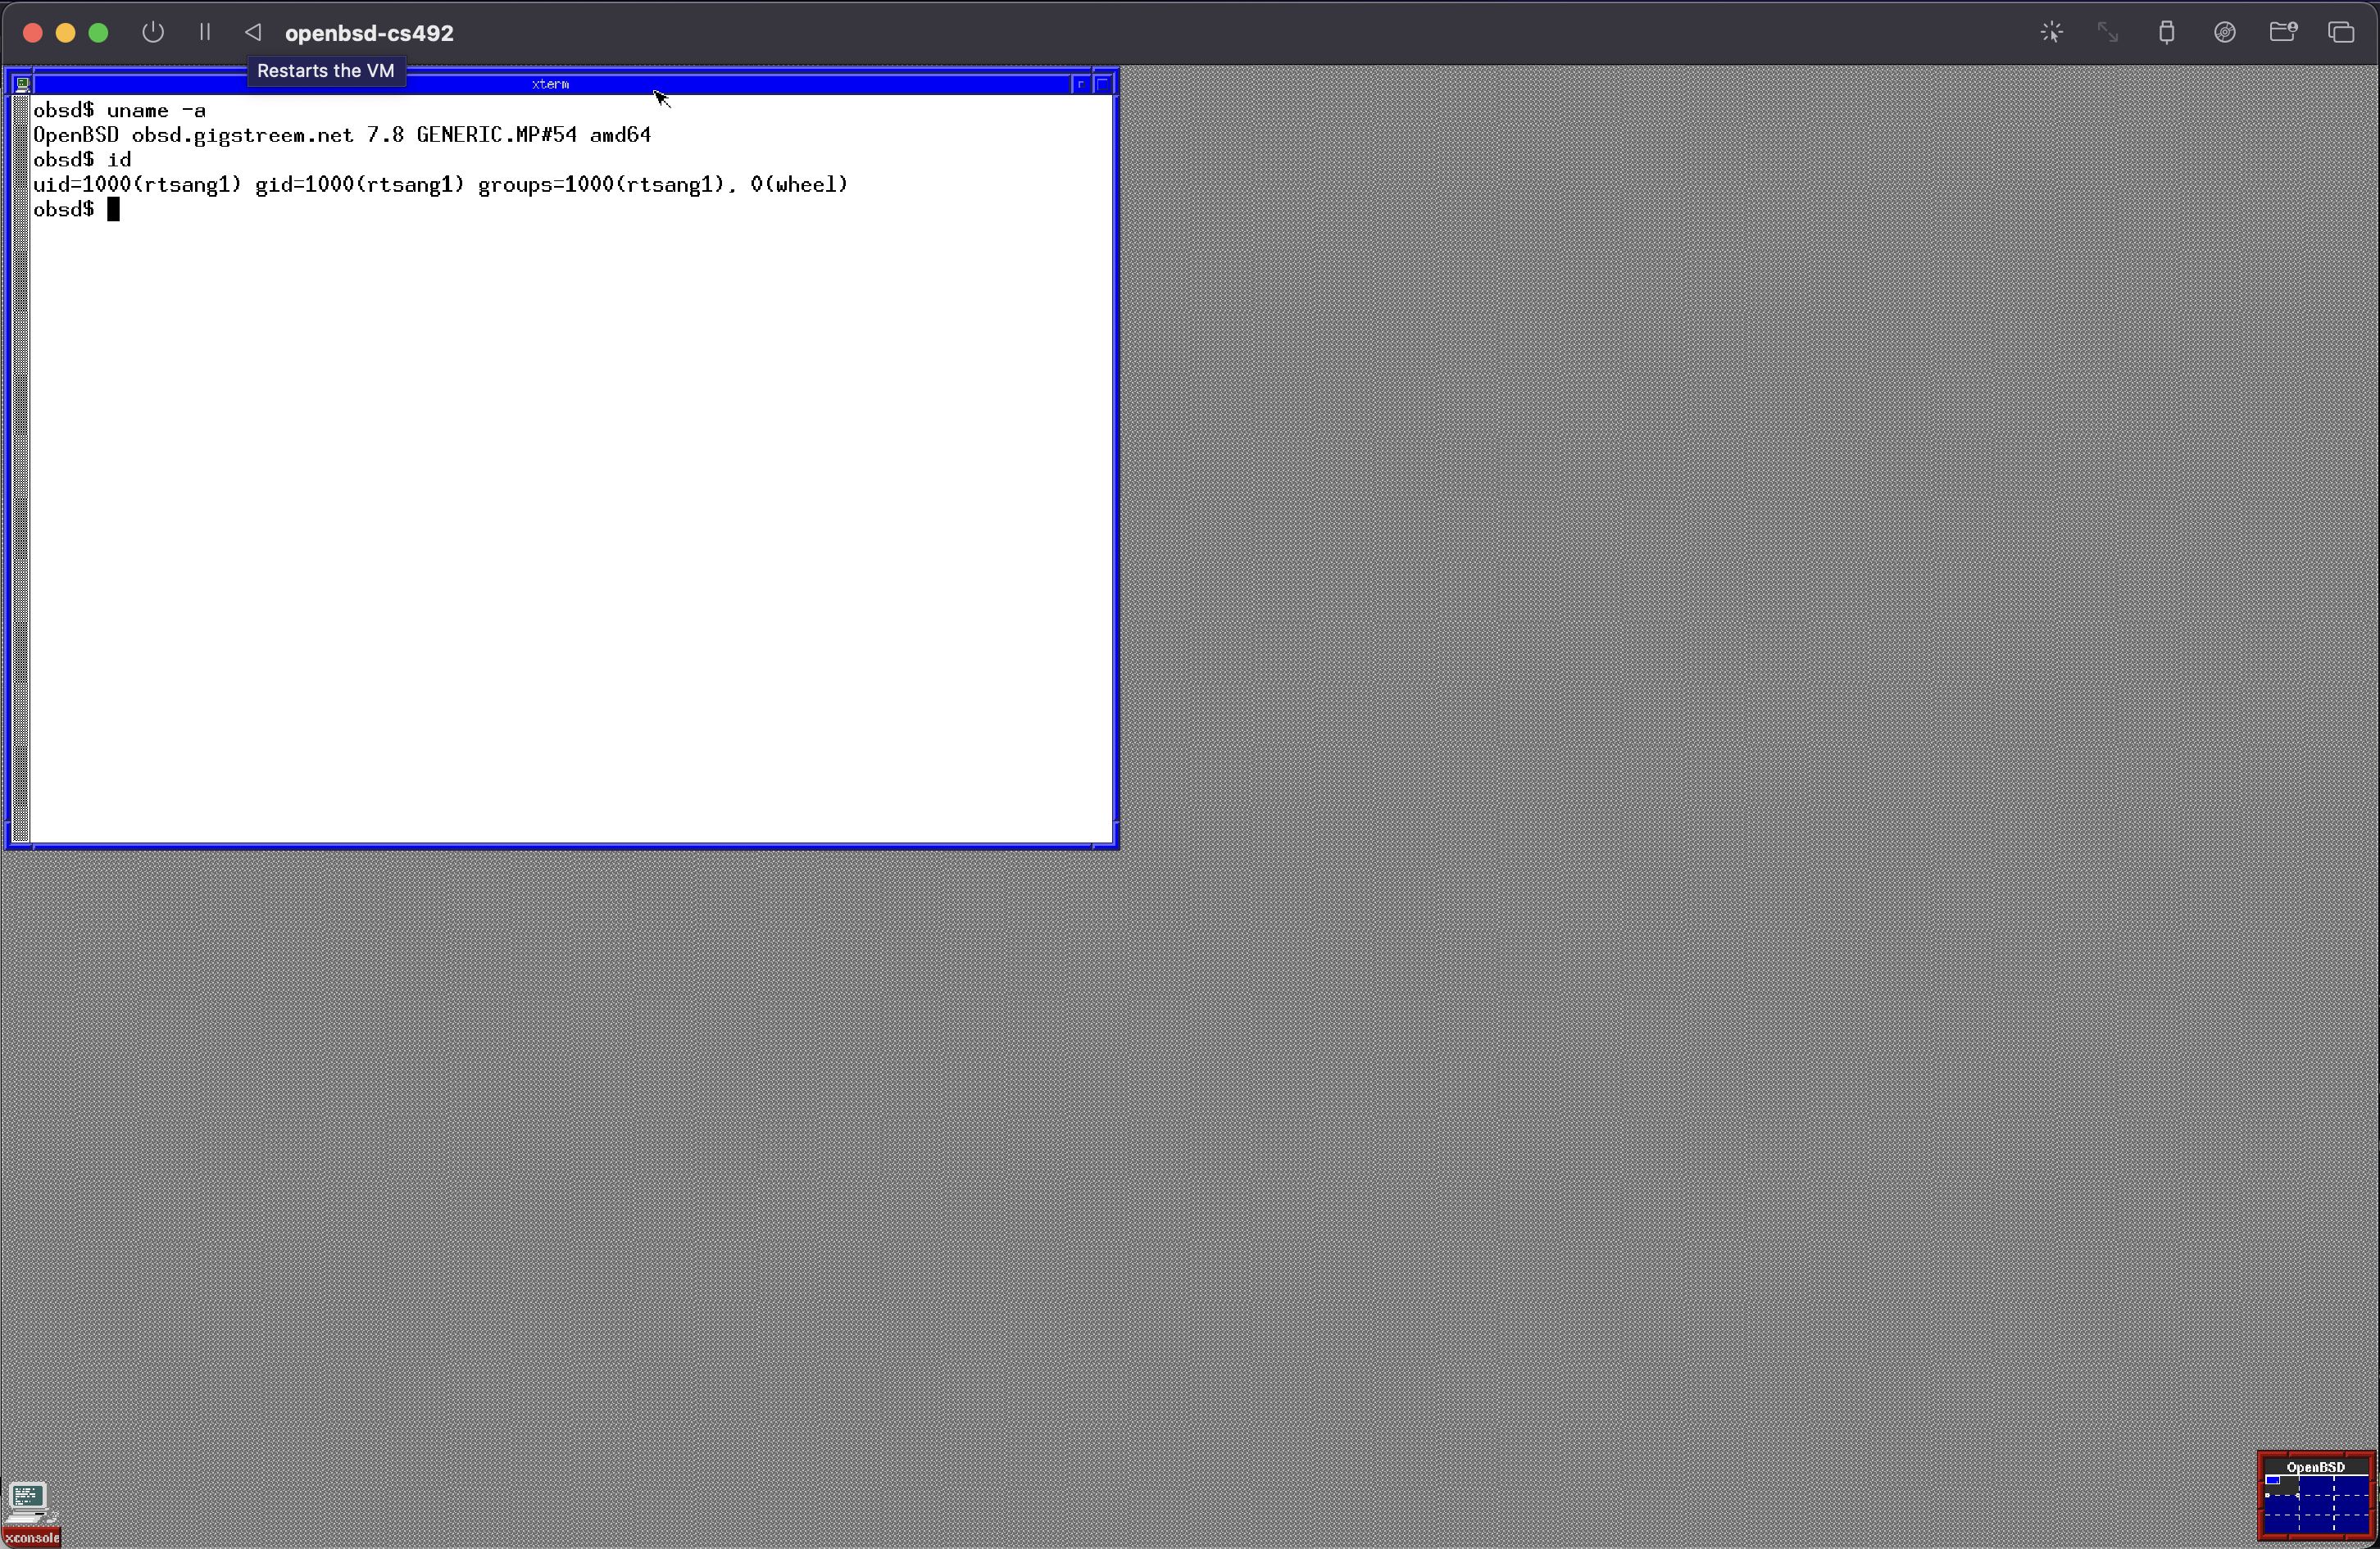
Figure 1: OpenBSD Deliverable Example Once you have a screenshot, you can shut down OpenBSD by running
doas halt -pin the xterm window and enter the root password. This will halt the virtual machine (-pmeans powerdown), save files to the hard disk (“synching disks…done”), then power down the VM.-
After powerdown, you can delete the entire VM as it will not be used again in this course. You can also delete the
installXY.isofile.Congratulations on using OpenBSD!
6 - Installing Arch Linux
Arch Linux is interesting for you to install and use because:
It has a text-based installation procedure which is even more minimalist than the OpenBSD one. While an installation script exists, it does not configure Linux as we would like, so we will be installing everything command by command.
It will show you that not all Linux distributions have GUI-based install procedures like Ubuntu or Debian. This is an opportunity to get comfortable in the command line if you haven’t done so already.
6.1 - Creating the Arch Linux VM
-
Download Arch Linux:
- Go to the Arch Linux website and navigate to the “Download” page.
- On the “Download” page, go to the “Worldwide” section, and click the first mirror link available.
- Download the
archlinux-x86_64.isofile.
-
Create a new VM in VirtualBox or UTM:
- Give the name “cs492-archlinux” to your new VM.
- For the “ISO image”, select the
archlinux-x86_64.isofile you just downloaded. -
Under “Hardware”:
- Memory Size: 4096 MB
- Processors: max physical cores
-
Under “Hard Disk”:
- Virtual hard disk size: 6 GB
(Apple UTM Users) Under “Display” in VM settings, change the “Emulated Display Card” to “VGA”, or you may see a blank screen when you try to install Arch.
At this point, you should have a virtual machine with an empty 6 GB virtual disk, and a virtual CD containing the Arch Linux installation software.
6.2 - Installing Arch Linux on the VM
Remember to read each step carefully before doing it!
6.2.1 - Booting the VM
-
Start your virtual machine.
The VM will automatically boot from its virtual CD and start running the installation software, a special copy of Arch.
Similar to OpenBSD, you should see a menu come up. This is Arch’s installation bootloader, which will allow you to select the kernel to use, and will automatically select a kernel after 15 seconds.
Once the kernel is selected, it will start. In Linux, kernel messages should show a timestamp at the beginning of the line. This may be blank (
::) in the VM.As the kernel starts,
systemdwill start.systemdis a part of the Arch operating system, outside the kernel, that automatically starts various system services. It will show logging messages that start with a green[OK]if the corresponding service started successfully.After the kernel finishes booting, you will get a shell with the prompt
root@archiso ~ #. This is normal, since Arch doesn’t have an installation script by default. Instead, you will now install Arch manually by executing the commands one by one. Note: “root” is the system administrator, “archiso” means you are running from the ISO-formatted installation CD, “ “ means you are currently in root’s home directory, and “#” is the traditional shell prompt when you are root. If the text is too small in the terminal, run the command
setfont -dto double the font size on the screen. Runsetfontwithout flags to reset the font size.
6.2.2 - Network Configuration
- Arch should have automatically connected to the Internet via the VM’s Ethernet network interface. To verify this, execute
ping archlinux.org. If the network is set up correctly, you should see ping responses (it may take a while to run on UTM due to emulation). Stop ping withCtrl-C.
6.2.3 - Hard Disk Configuration
As with OpenBSD, we need to create a primary partition for Arch and a Linux file system inside this primary partition. However, where OpenBSD automated some of this process for us, we will need to use the fdisk utility ourselves to do so.
6.2.3.1 - Root Disk and MBR Configuration
List hard disk names with
fdisk -l. Ignore/dev/loopdisks, as these are fake disks used by Linux internally. You should see a/dev/sdadisk with a size of 6 GiB, with the name “VBOX HARDISK” (or “QEMU HARDISK” on UTM). We will create the primary partition here.-
Execute
fdisk /dev/sdato begin an interactive editing session with the/dev/sdadisk.Enter
mto see a list offdiskcommands. Commands are generally all single letters.Enter
pto see the current list of primary partitions on the VM disk. Currently, it should show general disk information but list no primary partitions.-
Enter
nto create a new primary partition with the following configuration:Setting Value Comment Partition Type Default ( p)We have not discussed extended partitions yet and will stick with primary partitions. Partition Number Default ( 1)Recall that MBR supports up to 4 primary partitions. Using 1will create the partition/dev/sda1.First Sector Default ( 2048)This indicates the hard disk sector number where the start of the primary partition will be.
Note again that we will leave some free space left between the MBR (first sector) and the start of the primary partition for the bootloader. Don’t modify this value unless you know very well what you are doing.
Last Sector Default (a large number) The last sector of the primary partition. The difference between the first and last sector numbers plus 1 will give the total size of the new partition, which will be the entire disk size here. -
Enter
pto see the list of primary partitions (not yet committed). You should see the device/dev/sda1with the start and end sector numbers used, and the type “Linux”.There is a separate fdisk command to create a Windows or OpenBSD primary partition.
If you made a mistake, you can delete the staged partition using
dto start over. Once you are sure things are set up correctly, you can commit the changes to disk by enteringw. This will also return you to the root shell.
6.2.3.2 - File System Configuration
Linux uses exactly one file system per primary partition (like Windows), so the “disk label” process in OpenBSD is unnecessary.
-
Create a new file system in
/dev/sda1by runningmkfs.ext4 /dev/sda1.This creates a new ext4 file system in
/dev/sda1that spans the entire primary partition.The output of
mkfs.ext4will print information referencing “inodes” and “superblock”, which we will cover later in the semester. -
Mount the new file system to an existing directory by running
mount /dev/sda1 /mnt.On OpenBSD, the new file system you created was automatically mounted for you on
/mntby the installation script. On Arch, you need to do this yourself. Right now, the kernel you are using is the one you booted from the CD, and the/root file system is the one from the CD (for simplicity’s sake).The command you ran will temporarily mount the file system in the
/dev/sda1partition in the/mntdirectory so you can actually modify it during the rest of the installation procedure. Running
mountagain will show all currently mounted file systems. At the end of the output, you should see the primary partition/dev/sda1ext4 file system mounted in/mnt.Execute
ls -l /mntto check that the new file system is empty, except for a “lost+found” directory, which can be ignored.
6.2.4 - System Installation and Configuration
-
Once the file system is mounted, you can copy the file sets for Arch to the new file system.
File sets for Arch are available as packages from servers on the Internet. Run
reflectorto configure the closest servers for downloading file sets.-
Run
pacstrap -K /mnt base linux linux-firmware. It may take a while.The
pacstrappackage manager will download thebasepackage for cli utilities,linuxpackage for the Arch kernel, and thelinux-firmwarepackage for updating hardware device controller firmware.All of these will be installed the the
/mntdirectory as a minimal Arch system.
-
Execute
genfstab -U /mnt >> /mnt/etc/fstabto generate a new/etc/fstabfile in the file system, which Arch will use later when booting to know determine the file system to use.Note: the
>>means “append program stdout to the end of the file”, while a single>will overwrite the file. Execute
cat /mnt/etc/fstabto see the content of the new file. You should see that your/dev/sda1primary partition will be the root file system once you boot Arch from the VM’s hard disk.Switch to the new file system root by running
arch-chroot /mnt. This will cause/to be located at/mnt, and the shell prompt will change fromroot@archiso ~ #to[root@archiso /]#.Execute
lsto list the contents of the root directory in the new file system. You should see all the root-level Unix directories.-
Configure date and time:
Execute
dateand confirm that the VM is currently configured to use the default UTC time zone.Execute
ln -sf /usr/share/zoneinfo/EST /etc/localtime. This will specify the correct time zone by creating a symlink to point at the right time zone.Execute
dateagain and confirm the date and time are correct.
-
Name the VM system
Run
cat > /etc/hostname. Thecatprogram will wait for input on stdin.Type in
archand hitEnter, then pressCtrl-dto quit to the shell.Execute
cat /etc/hostnameto see the content of the new/etc/hostnamefile, and you should seearchon a single line.
Execute
passwdto set the password for the root user. Usearchas the password. This will be a blind input, which you will input type twice.
6.2.4.1 - Package Manager and Network Configuration
-
Execute
pacman -S reflectorto installreflector. We will usereflectorto configure the new Arch system with the correct package servers.The
reflectorprogram we used before was from the CD, and is not yet available in the new file system.The
pacmanprogram is Arch’s standard package manager. You can use it to download and install thousands of different software packages, similar topkg_addon OpenBSD andapton Debian-based systems. Execute
reflectoragain to configure the new Arch system with package servers.Execute
pacman -S dhcpcdto install a DHCP client, otherwise the system will not be able to get an IP address and connect to the Internet when we boot from the hard disk later.-
Find the VM’s network interface by running
ip addr.You should see a network name like “enp0s1”, ignore loopback interfaces. Remember this name, as we will use it to configure
systemdto automatically start thedhcpcdclient at boot time.dhcpcdwill automatically get an IP address for the VM’s Ethernet network interface to allow the VM to connect to the internet. Configure
systemdto start thedhcpcdclient with your network name by runningsystemctl enable dhcpcd@<network-name>.service. For example, with “enp0s1”, it would besystemctl enable dhcpcd@enp0s1.service.Execute
systemctl enable systemd-resolved.serviceto configure the DNS resolver, which translates computer names to IP addresses for you. The OpenBSD installation script performed this network configuration for you.
6.2.5 - Bootloader Installation
The last step is to install a bootloader, which will load the kernel into memory at boot time. The standard bootloader for Linux is GRUB.
Download GRUB:
pacman -S grub.-
Install GRUB:
grub-install --target=i386-pc /dev/sda.This installs GRUB after the master boot record and before the primary partition.
-
Generate the
/boot/grub/grub.cfgconfiguration file for GRUB:grub-mkconfig -o /boot/grub/grub.cfg.This tells GRUB which menu entries to offer to the user when booting the VM. You can execute
cat /boot/grub/grub.cfgto see the content of GRUB’s configuration file. It’s ugly. -
Run
exitto go back to the/root file system of the installation CD, then depending on your system, do the following:Before you shut down the VM, go the the “Devices” menu of the VirtualBox window.
Under “Optical drives”, select “Remove disk from virtual drive”. Click “Force Unmount” if necessary.
Then execute
shutdown nowto stop the VM.Execute
shutdown nowto stop the VM.Once the system has shut down, close the window and open UTM settings for the VM.
Under “IDE Drive”, select the virtual installation CD (
archlinux-x86_64.iso), then select “Delete Drive”.
6.3 - Using Arch Linux
We will now create a user account and, like OpenBSD, need to give our user account admin privileges.
6.3.1 - Setting User Admin Privileges
-
Start the Arch Linux VM. You should see a similar process as before, where the GRUB boot loader will copy the selected kernel to memory.
After the kernel finishes booting,
systemdwill start and initialize all system services quietly. -
Login as user
rootwith passwordarchand configure a new user account:You will be logged in to a bash shell, where you can run
ls -lato see the files inroot’s home directory.Execute
setfont -dto double the font size if needed.Create a new user (replace with your name and Stevens login):
useradd -c 'Ryan Tsang' -m rtsang1.Configure the user password, using
archas the password:passwd rtsang1.Add your account to the wheel group:
gpasswd -a rtsang1 wheel.Install
sudo:pacman -S sudo.Install
vi:pacman -S vi.-
Configure
sudoto allow all users in the “wheel” group to run commands as root:Edit the
/etc/sudoersfile:visudo.In
vi, type:125and hitEnterto jump to line 125 in the file. This should be the first line that starts with# %wheel.-
Uncomment the line (
\#is a line comment) by typingxwith the cursor highlighting the character. Do this again to delete the space as well.The line should now start with
%wheel, which will allow all users in thewheelgroup to execute commands as admin. Type
:wqand hitEnterto write the disk to file and quitvi.
Run
exitto return to the login prompt.
6.3.2 - Starting the X Window GUI
As we did for OpenBSD, we will be manually installing the X Window GUI.
Login with your Stevens username using password
arch. Runpwdto see where the current directory is located, andls -lato show a detailed list of the current directory’s contents.-
Install the X Window system as root:
sudo pacman -S xorg xorg-xinit xterm xorg-fonts-misc xorg-fonts-type1This will install the X Window system itself (
xorg),xterm, and some fonts. -
Install the Ice Window Manager:
sudo pacman -S icewm -
Configure X Window to use IceWM as its window manager by creating a file named
.xinitrcin your home directory with the name of the window manager to use:echo "icewm" > .xinitrcNote the “.” at the beginning of the filename. This is common for configuration files in Unix. If you run
cat .xinitrc, you should see only “icewm” appear on the console output. Run
startxto start X Window.
6.4 - Deliverables
To prove you have installed and used Arch successfully, you will submit a screenshot showing the Arch Linux kernel version and the output of the id command.
-
Enlarge the text in the
xtermterminal window.- Hold
Ctrl+Right-Clickin the center of thextermwindow to see text size options and select “Huge”.
- Hold
-
Run the following commands:
-
uname -ato show Arch Linux kernel version. -
idto show username and user groups.
-
-
Take a screenshot of the Arch screen. You can use VirtualBox’s built-in option
View -> Take Screenshot, or your host OS screenshot tools.An example can be seen in Figure Figure 2.
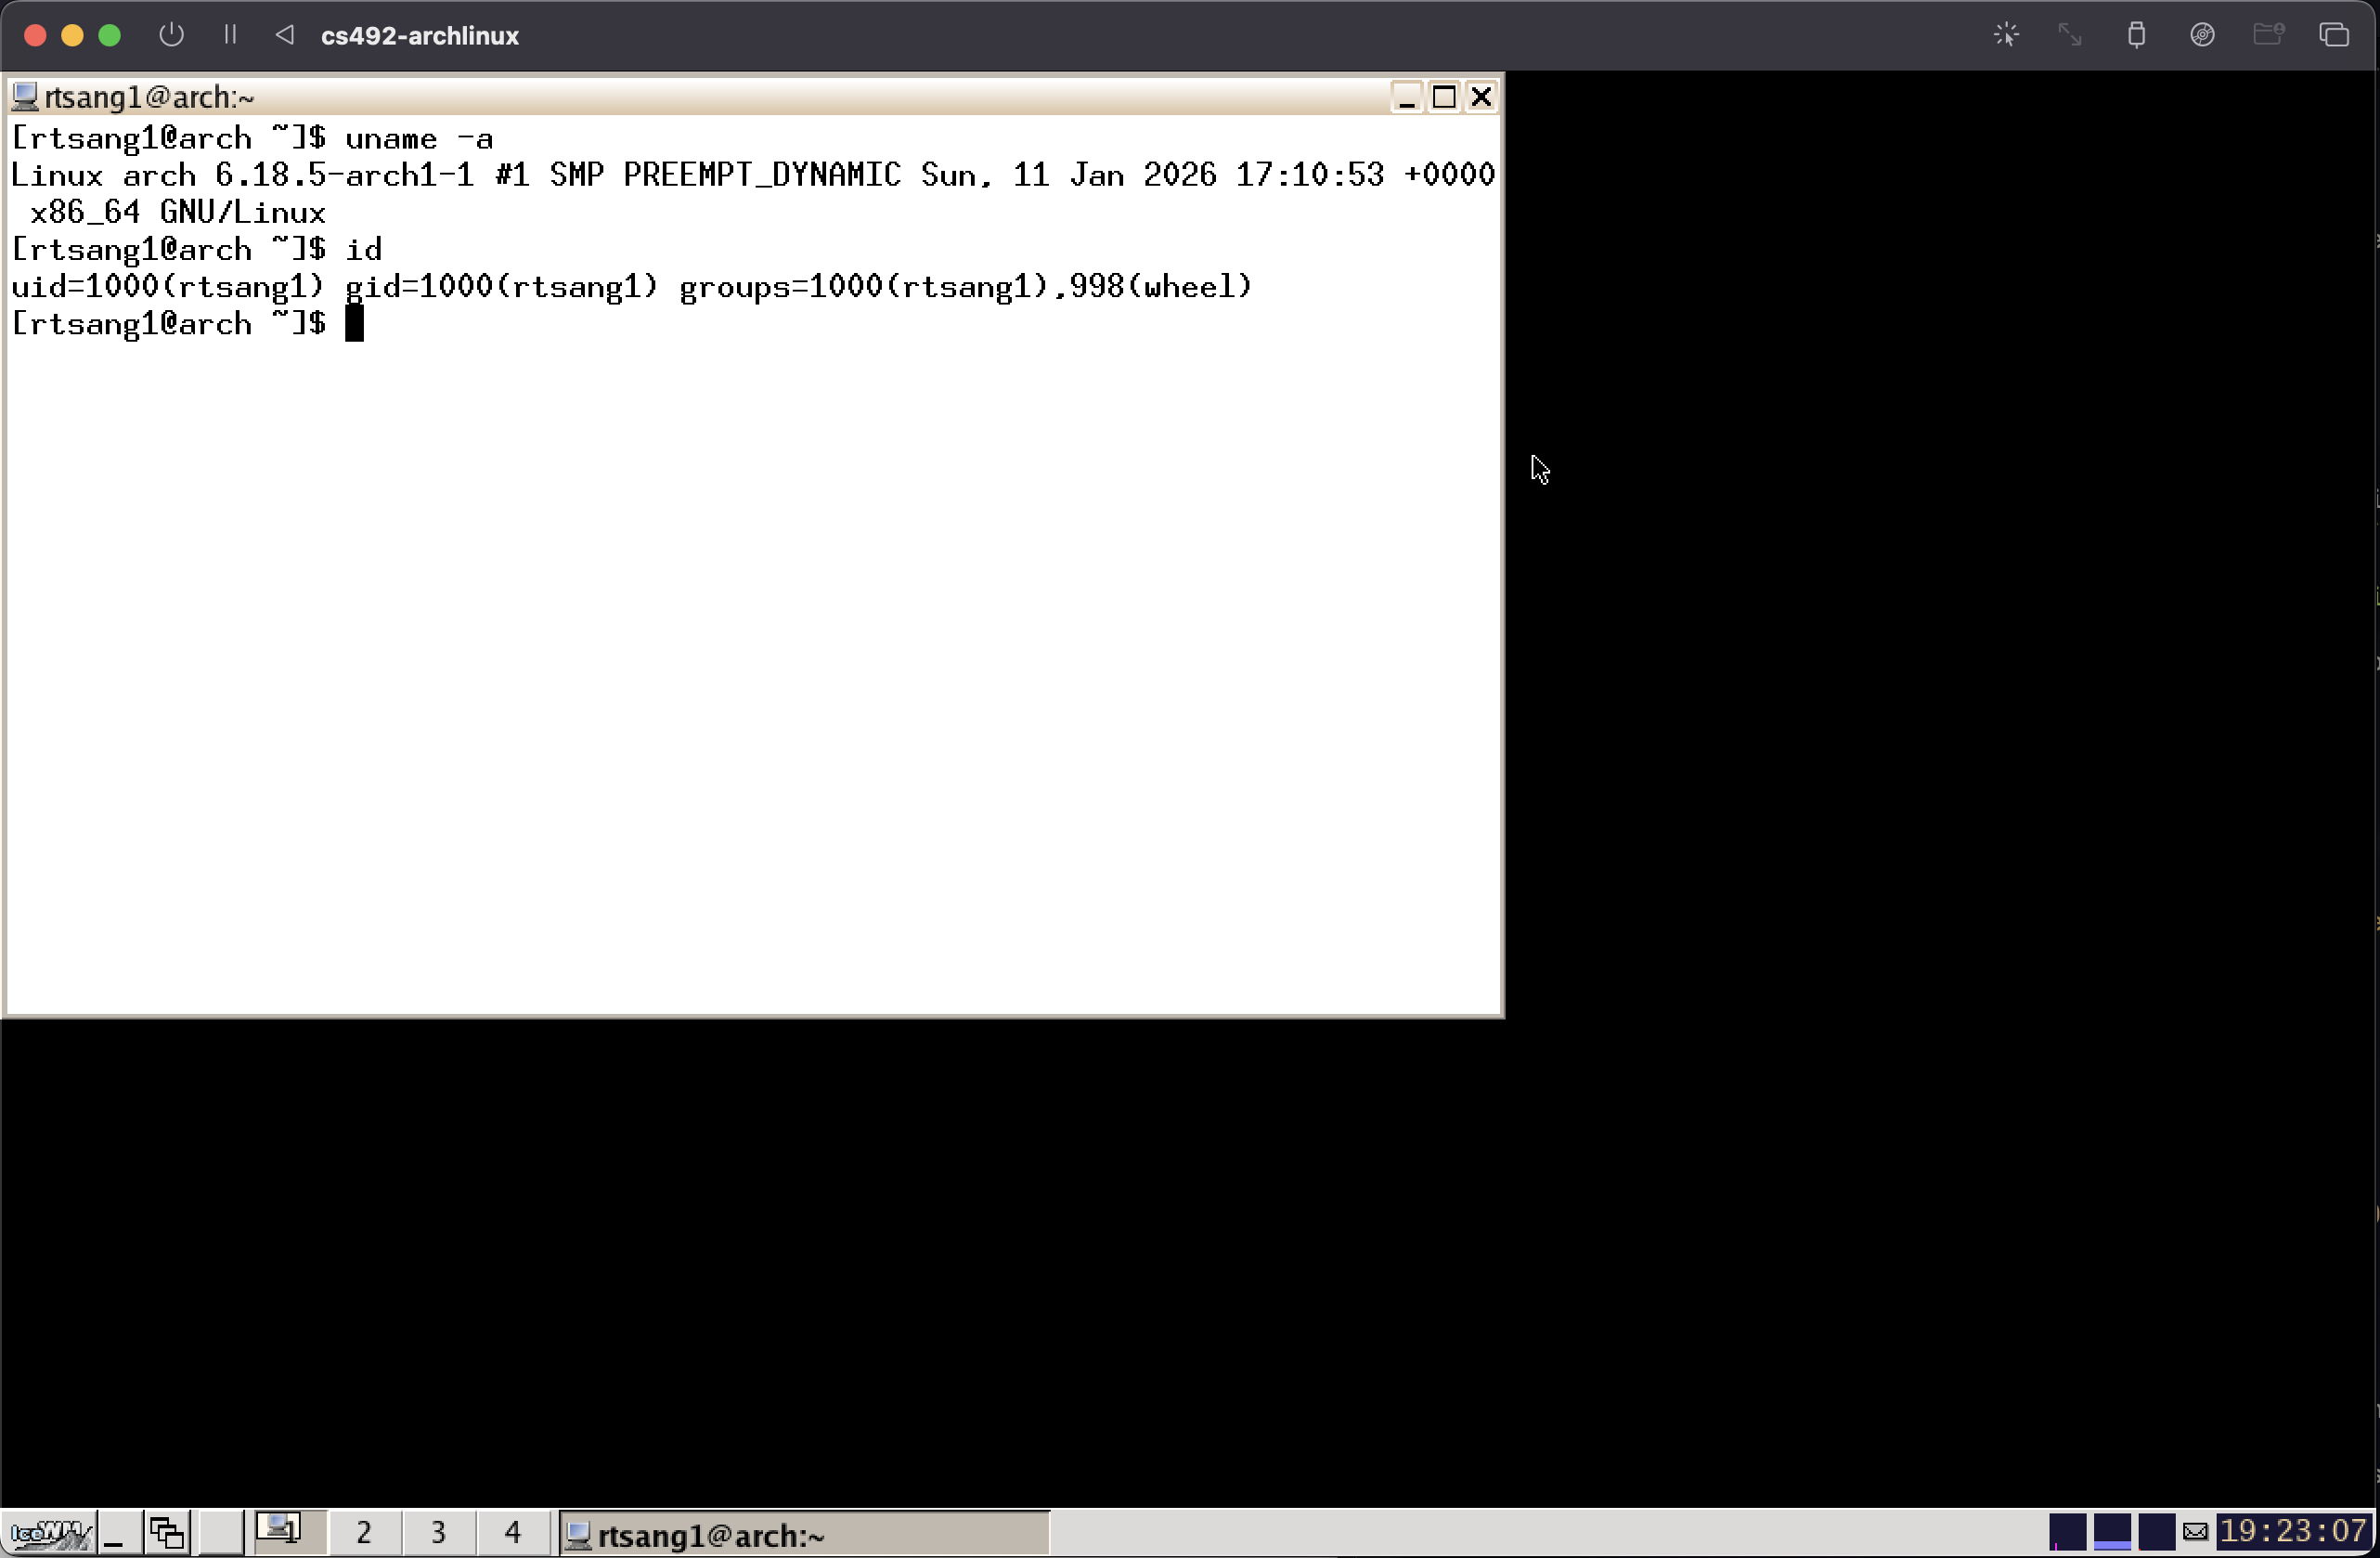
Figure 2: Arch Linux Deliverable Example Once you have a screenshot, you can shut down Arch by running
sudo shutdown nowin the xterm window and enter the root password.-
After powerdown, you can delete the entire VM as it will not be used again in this course. You can also delete the ISO file.
Congratulations on using Arch!
7 - Quick Comparison of OpenBSD and Arch Linux
If you compare te way you installed these two operating systems, the whole procedure is largely the same:
- Download and boot a special version of the OS from a CD (or USB thumb drive)
- Create a primary partition on the hard disk
- Create a file system inside the primary partition
- Copy and install all the necessary files for the new OS from the CD or Internet
- Install a bootloader, which will start the kernel on boot
- Configure various settings, such as network interface, users, time zone, and other software.
There are a few notable observations:
OpenBSD normally uses only one primary partition, which can contain multiple file systems. Arch Linux, and Linux systems in general, as well as Windows, can use mulitiple primary partitions, with a single file system on each partition. In practice, the result is generally the same: you can have multiple file systems for various purposes (e.g.
/for root,/homefor users, etc.)OpenBSD has a nice, but terse, installation script that does many things for you. Arch also has an installation script, but we did things manually here.
Both operating systems have many shared utility programs (
ls,pwd,cd,fdisk, etc.) but some are different (doasvs.sudo,pkg_addvs.pacman).Both operating systems use the same X Window GUI, which is quite basic, but is the standard GUI for Unix systems. On top of X Window, you can install a nicer looking “desktop environment”, such as GNOME, KDE, Xfce, or any number of others.
8 - Installing Debian
Now we will install Debian, which we will be using for the rest of th semester. If you have used Ubuntu before, it will feel very similar, as Ubuntu is based on Debian, and uses the same underlying package manager, apt. Debian is just as easy to use, but ships with less software and automatically shows the GRUB bootloader at boot time, which you will need to use in later assignments to boot your own Linux kernel.
8.1 - Creating the Debian VM
-
Download Debian
- Visit the Debian homepage and ignore the “Download” button. Visit the “Other downloads” link instead.
- Navigate to the section “Download an installation image” and visit the “small installation image” link.
- Navigate to the section “Small CDs or USB sticks” and download the “amd64” option.
From here, install instructions are different for VirtualBox and UTM.
8.1.1 - VirtualBox
-
Create a new VM:
- Give the name “cs492-debian” to the VM.
- For “ISO image”, select
debian-X.Y.Z-amd64-netinst.iso. Leave “Skip Unattended Installation” box unchecked. -
Select the “Unattended Install” option and use the following configurations:
Setting Value Comment Username Stevens username (e.g. rtsang1)Password debianHostname debianDomain Name Default Guest Additions Yes Use the VBoxGuestAdditions_X.Y.Z.isofile you downloaded previously.Memory Maximum recommended Use the limit of the memory green zone Processors Maximum recommended Use the limit of the cpu green zone. You will need the power when you manually compile the linux kernel in the next assignment. Virtual Hard Disk Size 60 GB The OS alone requires at least 6 GB, rounded up to 20 GB for additional software, such as VS Code, another 20 GB for a “working” copy of the Linux kernel source code, and another 20 GB for a backup of compiled kernel code. The backup will be needed if you bork the working copy in programming assignment 2, as saving compiled artifacts in a known good state will reduce compile time if you need to nuke your working copy.
VirtualBox will create the VM with an empty 60 GB hard disk and virtual CD, then automatically boot the VM and run the install process automatically.
If you watch carefully, you should see the following:
- The VM boots the Linux kernel
- DHCP will configure the VM’s
enp0s3Ethernet network interface to connect to the internet- A partitioning tool will create a primary partition with a new file system
- The base Debian system will be installed to the file system and configured
- Many extra software packages will be installed (e.g. Python, LibreOffice, etc.)
- GRUB will be installed
- More configuration and cleanup
- Once the system is ready, the install CD will be automatically ejected and the VM will reboot.
- VM boots from hard disk
- GRUB bootloader starts
- Linux kernel starts
systemdstarts- Login prompt displays in the default GNOME desktop environment, which uses the Wayland compositor instead of X Window.
8.1.2 - UTM
Unlike VirtualBox, UTM cannot automatically install Debian, and you will need to use Debian’s installation GUI, which is very similar to setting up Ubuntu.
Create a VM with the name
cs492-debianand 60 GB disk size. Refer to Section 3.2.1.In the VM settings, change the CPU to “qemu64” (end of the list).
Start the VM.
-
Install Debian using the default “Graphical install” option with the following configuration:
Setting Value Comment Language Default ( English)Location Default ( United States)Keyboard Default ( American English)Hostname debianDomain name Default (none) Root password debianFull Name Your name Username Your Stevens login (e.g. rtsang1)Password debianTime Zone Default ( Eastern)Partitioning Method Default ( Guided - use entire disk)Partitioning Scheme Default ( All files in one partiton)Write changes to disk? Yes Scan extra installation media? Default ( No)Debian archive mirror country Default ( United States)Debian archive mirror Default ( deb.debian.org)HTTP proxy information Default (none) Pacticipate in package usage survey Default ( No)Choose software to install Default Install GRUB to your primary drive? Default ( Yes)Device for bootloader installation /dev/sda Remove the virtual installation CD.
8.2 - Using Debian
Start the VM and log in with your
debianpassword.Skipyour way through the “Welcome” windows.If you do not see a toolbar at the bottom of the window, click the “Activities” menu in the top left corner. You should now see a toolbar with various applications that come preinstalled on Debian. We will not use these for the course.
Select the 3x3 grid of dots to see more applications, and find the “Terminal” application.
Right-Click“Terminal” and select “Pin to Dash”, which will add the application to the toolbar. Then open the “Terminal” application.Execute
ls -lato list the files in your home directory, andpwdto print the path to your home directory.-
Give yourself administrative privileges to use
sudo:Switch to the root user account by running
su -(which means “substitute user” and historically, “superuser”). You will need to login using the root credentials,debian.-
As root, add your user account to the
sudogroup (unlike OpenBSD and Arch, which use thewheelgroup):usermod -aG sudo rtsang1 -
Run
exitto return to the user shell and restart Debian.- Click the battery icon in the upper right corner of the desktop.
- Click the power icon and select “Restart” and confirm.
Log back in for you changes to take effect.
8.2.1 - Exploring Debian
-
Run the following commands to have a look around your Debian VM
-
sudo fdisk -lThis should show the VM’s disk is named
/dev/sdaand that it has a/dev/sda1“Linux” bootable primary partition, inidcated by a*in the output.There is also a
/dev/sda5swap partition, which is used by the kernel’s virtual memory system, as we will see later in the semester. Note also that although the MBR partition system only allows 5 primary partitions, the swap partition has index 5. This is because the swap partition is not a primary partition, but an extended partition, which itself is in the/dev/sda2primary partion, set up to support extended partitions. This is why/dev/sda2and/dev/sda5have about the same start sector and size. -
cat /etc/fstabThis will show your
/root file system is of type ext4. You can also see the swap extended partition if of the special type “swap”, meaning it does not contain a file system. -
mountThis will show that the
/dev/sda1ext4 primary partition is mounted at/. -
df -hThis will show a usage summary for various file systems.
/dev/sda1should currently be using about 5 GB, with another 50GB or so available. -
ls /bootThis is where your linux kernel is stored. You can also find there the “grub” directory that contains the
grub.cfgconfiguration file for the GRUB bootloader. -
which gccThis will print
/usr/bin/gccif C compiler is already installed. If it is not, you can install it and other C development packages by running:sudo apt install build-essentialThe
whichcommand is used to find where different programs are installed on your system if they are in your current PATH.Try doing the same with the
vitext editor, themakebuild system, thepython3interpreter, and thefirefoxweb browser. You can see a long list of default installed programs by runningls /usr/bin.
-
-
Installing software
Use the
aptpackage manager to install software on Debian, for example, emacs:sudo apt install emacs-noxYou can search for available packages in the debian package repository.
-
To shut down the VM, execute
sudo shutdown nowin a terminal window, or user the GUI option. Shut down your VM now.Note: Never shut down the VM by closing the window in your host machine! Doing so can corrupt the virtual file system in the VM, and while the file system is capable of some self-repair, it is not advisable to rely on it. Only do so if the VM is truly frozen or unresponsive.
8.2.2 - Configure Host File Sharing
8.2.2.1 - VirtualBox
In the “General” menu, under “Advanced”, change both “Shared Clipboard” and “Drag’n’Drop” to be “bidiractional”. This will allow you to copy and paste between Debian and your host OS.
-
Set up a shared directory with the host:
- On you host OS, create a new folder named “shared” anywhere you like.
- In the VirtualBox VM “Settings”, select “Shared folders”.
-
Add a new shared folder by selecting the green “+” icon and configure as follows:
Setting Value Comment Folder Path sharedUse the “shared” folder you just created Folder Name sharedMount point /mnt/sharedThis will be the location of the shared folder in Debian. Auto-mount YesThis will make sharing happen automatically when the VM starts.
Start the VM, log in, and open Terminal.
Execute
ls /mnt/sharedto confirm you can see the content of thesharedfolder on your host.In your home directory, run
ln -s /mnt/shared shared, then confirm the symlink works by runningls shared. You should see the content of thesharedfolder.
8.2.2.2 - UTM
You have options on UTM, though both have their downsides.
You can use SPICE WebDAV, which has an easier setup, or VirtFS, which will have better performance.
The instructions here are for setting up shared folders via VirtFS:
Create a folder named
sharedon your host OS, wherever you like.-
Before launching the VM, configure the VM to use VirtFS for sharing:
- Open VM settings and go to “Sharing”
- Ensure “Enable Clipboard Sharing” is checked
- Select “VirtFS” for “Directory Share Mode”
- Select the path to the
shareddirectory you created
Launch the VM and open Terminal
-
Add the shared folder to the file system table (
fstab):- Run
sudo vi /etc/fstabto edit thefstabfile withvi. -
The following commands are case sensitive:
- Type
Gto go the start of the last line of the file. - Type
oto insert a new line below the current line and enter Insert mode. -
Add the following lines to the file:
# UTM Shared Folder
share /mnt/shared 9p trans=virtio,version=9p2000.L,rw,_netdev,nofail,auto 0 0 - Type
Escto leave Insert mode. - Type
:wqto write the changes to file and quitvi.
- Type
- Run
-
To avoid permissions issues, we will use bindfs to then mount the
/mnt/sharedfolder to a folder in our user home directory.Install
bindfs:sudo apt install bindfsWe will likely need to map the user and group ids of files in
/mnt/shared, so we need to find out the user and group IDs of the guest and host machines.In Debian, run
idand find the user ID (UID) and group ID (GID). By default, these are typically both 1000.In a host terminal, run
idand do the same.-
Now add the following lines to the
fstab, following the same general procedure as above, and replacing bracketed fields (e.g.<guest_uid>) as needed:# bindfs mount to remap UID/GID
/mnt/shared /home/<username>/shared fuse.bindfs map=<host_uid>/<guest_uid>:@<host_gid>/@<guest_gid>,x-systemd.require=/mnt/shared,_netdev,nofail,auto 0 0
Restart the VM by running
sudo reboot-
Test the shared directory:
- In your host OS, create a test file named
test.txtin theshareddirectory you created. - In Debian, edit it by running
echo "testing" >> shared/test.txt. - In your host OS, check that the change appears by running
cat test.txtfrom a terminal in your host.
- In your host OS, create a test file named
8.3 - Deliverables
To prove you have installed and used Debian successfully, you will submit a screenshot showing the Debian kernel version and the output of the id command.
-
Enlarge the text in the
xtermterminal window.- Hold
Ctrl+Right-Clickin the center of thextermwindow to see text size options and select “Huge”.
- Hold
-
Run the following commands:
-
uname -ato show Debian kernel version. -
idto show username and user groups.
-
-
Take a screenshot of the Debian screen. You can use VirtualBox’s built-in option
View -> Take Screenshot, or your host OS screenshot tools.An example can be seen in Figure Figure 3.

Figure 3: Debian Deliverable Example -
Once you have a screenshot, you can shut down Debian and delete the ISO installation image.
Congratulations on using debian!
9 - Submission
On Gradescope, submit a PDF file that contains:
- The Stevens Honor Pledge
- The 3 screenshots you created, one for OpenBSD, one for Arch, and one for Debian. Each screenshot should clearly show your login name, and the command output.